Saturday, 19 January 2013

Logical Data Model


Periodically I go through minor obsessions - these days it seams it's building Logical Data Models.

Why do I bother?

Well, firstly because I'm a lot better understanding visual stuff.

Secondly, because if you're not the one building the database you need to 'hand over' the data in some standard form.

So, here it is ready- a diagram of all data items Smashingtrips needs to manage ( well, a part of it, just to get an idea about how it looks).


And here it is, a short guide on how to build a Logical Data Model (assuming you know some basic stuff about data modelling).

1. Start with the High Level Business Requirements and underline the nouns.

'I'd like to be able to manage all my days out in one central place. I usually spend a day out either walking on the hills or in some urban place ...erm... walking. '

(I do other stuff as well and count it as a day out, however I'm not sure I want to record it or even remember some of them days, therefore those will be out of the scope of this exercise)

Back on track: for each Day Out, I'd like to be able to record detail information about the Route, Locations, Hazards, Places of interest.

I also bought a Garmin GPS, I'll record some of the routes as gpx routes and I'd like to be able to publish them for download.

The route will be described by an image map, and the walk can be already publish in a book in which case I'd like to be able to record the book name and a link to a shop selling it.

I want to be able to record a story for each day out and in each story to be able to include photos.

Each day out, based on the type, should be associated with a location: a city/ place or a region/ sub-region/ country. The website should maintain a list of such places in a nice hierarchy.'

2. Entities

Well, we've got them: all the underlined nouns above are your Entities, the categories for the data items. So go ahead and create a box for each.

3. Relationships

Start thinking of how the Entities relate together : how many instances of one Entity  will be involved in a relationship with another Entity?
The Day Out (Route) can have hazards described by how many Hazards?

These are the 'multiplicities' in your model and your choices are : 'one' (or an exact number), 'zero or many represented by  0..*', 'one or many represented by1..*'.

Some Dys Ot will have zero hazards, some might have many hazards, so the choice here is 'zero or many'. Easy.

4. Populate the Data Items/ atributes in the Entities as you go along.

5. Now, very important, let's address the subject of Keys.

For each Entity, find a data item (or a combination of Dagta Items) that will uniquely identify each Entity instance.
That is your Primary Key.

For each relationship, you'll need to copy the Primary Key into the linked Entities, in order to be able to navigate through the data model.

See the 'DayOut Id' in the DayOut Hazard Entity? This is what I'm talking about.

Have a look again at the model - it should make a bit more sense now.

6. Why the two colours for my entities boxes?

Well - some of the data is transactional data that will be changing dynamically (because I'll keep adding Days out content ), some of the data is Terminology data (or Lookup lists).
Lists of standard hazards, lists of standard types of places of interests, lists of countries etc.
My terminology data here is in green - useful to make the separation especially in real life, where some smart data designer might decide to build a reference/ terminology data service for anybody interested to use it at the Enterprise level.

The diagram above is done in Enterprise Architect, as a class model - EA is my tool of choice because of various positive experiences, way too many to mention.

Now that we have the data sorted, we'll see some screens hopefully.

Saturday, 5 January 2013

SmashingTrips.com - How are we doing for progress


Revisited the plan today and I'm incredibly behind with everything.


And yes, it's that bad :).

Friday, 4 January 2013

Garmin GPS - How to Load OpenStreetMap (OSM) Maps in your GPS

This post is about loading the UK OSM maps in my Garmin etrex VISTA HCx GPS device on the microSD card.

These maps are a lot better than the ones that came in my GPS, and they're free. So:

1. Go to http://talkytoaster.info/ukmaps.htm, this website provides the OSM UK maps both for your GPS and the for the software application  you  might  have on your computer: MapSource or Basecamp.

The  website's main page will give you the general overview -following that, read their FAQ page for important and step by step instructions (covers various Garmin GPS models).

2. I assume you have now understood you need a specific map file for your GPS (and it's not the same with the map file you'll be using with the software application on your computer). So try to download the correct .zip file.

This is the one I've downloaded:

OS 1:50K Look and Feel Mapset For Use With Garmin GPSrs Only - Routable+Contours
File Name:Size: UnzippedDescription:Download Link:
121228-British-Isles+Contours-Routable-OS50tt-GMAPSUPP.zip
contains
121228-British-Isles+Contours-Routable-OS50tt-GMAPSUPP.IMG
~540 MB British Isles Map (With Contours) - Routable.
Can be overlaid over other maps.
HTTP:121228-British-Isles+Contours-Routable-OS50tt-GMAPSUPP.zip
Torrent:121228-British-Isles+Contours-Routable-OS50tt-GMAPSUPP.zip.torrent

The HTTP link stoped a number of times with me, and you can not resume downloading, so I ended up installing the Torrent client and the download was straight forward, just click on the 'torrent' link. You'll download a .zip file.

3. Unzip this archive .zip file. Rename the map file '121228-British-Isles+Contours-Routable-OS50tt-GMAPSUPP.IMG' to GMAPSUPP.IMG. (your original file name might be slightly different).
The easiest way to do this is to Right click on the file, select Properties, highlight the text prefixed to 'GMAPSUPP.IMG' and delete it.


4. Create a folder called 'GARMIN' on the microSD card and copy the 'GMAPSUPP.IMG' in this folder.
(The path looks like 'I:\GARMIN\GMAPSUPP.IMG' in Explorer on my computer, your drive letter might be different)

5. Insert the SD card in the GPS device, the map will be picked up automatically.

6. Make a donation to talkytoaster on their website !


Tuesday, 1 January 2013

Garmin GPS - How to Load OpenStreetMap (OSM) Maps into MapSource/ BaseCamp

This procedure has been tested on the MapSource software application that came with my Garmin etrex VISTA HCx GPS device.

I wanted  to get started with managing tracks and routes, so these are the steps I took to load the MapSource application and to upgrade it with the OSM maps.

The process is easy and straight forward, so I would really recommend it - you'll end up with much better maps.

1. Have a look in the GPS original box - you'll find the CD labelled 'Trip and Waypoint Manager'. This is the software to install on your computer to help transfer files from and to the GPS device and to manage waypoints, tracks and routes.

2. The 'Trip and Waypoint Manager' CD has an 'autorun' facility - it will start installing the software once the CD is in the CD drive. Otherwise locate and run the setup.exe on the CD.

3. At the end of the installation process I ended up with an application called 'MapSource'.
(How good is that ? Having different names, one on the CD cover and another one for the application itself ? Confusing at best...anyway from now on we shall call it MapSource).

4. Right, now launch MapSource and have a look at the map that came with it.
If you share my thoughts that the MapSourse map is pretty basic (I'm trying hard not to use another adjective for it) you might decide to replace it.

In the end I went for the OpenStreetMap (OSM) maps, mainly because this was the advice I found on various websites and 'walking' forums. If you want to do the same, keep reading.

5. Go to http://talkytoaster.info/ukmaps.htm, this website provides both the OSM UK maps and the installer (in the form of a .bat file). 
The  website's main page will give you the generaloverview; following that, read their FAQ page for important and step by step instructions (covers various Garmin GPS models).

6. I assume you have now understood you need a specific map file for MapSource (and it's not the same with the map file you'll be using in your GPS). So try to download the correct .zip file.

Example:

OS 1:50K Look and Feel Mapset For Use With PC ONLY (MapSource or BaseCamp)
File Name:RequirementsDescription:Download Link:
121228-British-Isles+Contours-Routable-OS50tt-MapSource.zipWindows XP or Later & MapSource or BaseCamp. British Isles Map (With Contours) - Routable.See the Mapsource-British-Isles+Contours-OS50.txt file in the zip file for instructions.HTTP:121228-British-Isles+Contours-Routable-OS50tt-MapSource.zip 
Torrent:
121228-British-Isles+Contours-Routable-OS50tt-MapSource.zip.torrent


The HTTP link stoped a number of times with me, and you can not resume downloading, so I ended up installing the Torrent client and it worked like a treat.

7. Unzip the archive .zip file: a new specific folder will be created.
Mine is called '121214-British-Isles+Contours-Routable-OS50tt-MapSource'.
Don't change the name of the folder.
Open this folder and read the '....txt' file, it might be called Mapsource-British-Isles+Contours-OS50.txt, it contains instructions of how to proceed further.

8. So copy this folder under the c:\Garmin\ folder, as specified.

8. Locate and run (double click) the 'install.bat' file.
This file will alter your computer 'registry' file (you'll need admin rights in order to be able to do this operation.)
Also be aware that altering a system file comes with its risks, make sure you know what you're doing !

9. Monitor the installation messages on the screen - if the installation went OK, restart your computer to get the new 'registry' file loaded in the computer memory.

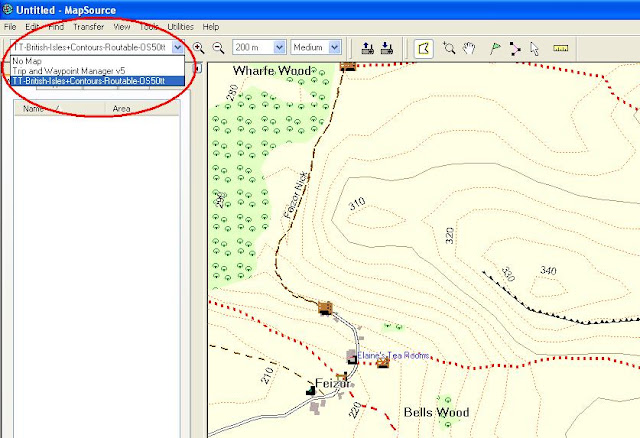
10. Start MapSource, locate and select the new OSM map (the map should now appear in the dropdown list, right under the Menubar) - see the red circle on the screenshot below. And voila !


11. Make a donation to talkytoaster on their website !

If you'd rather install BaseCamp instead of MapSource, download it and install it from Garmin's website, then continue at step 5.

I've installed MapSource, then the OSM maps, then BaseCamp and the OSM maps are available in Basecamp - didn't require any further installation.
What I'm trying to say is that if you install the OSM maps once they'll be available both in MapSource and BaseCamp.

I've also installed BaseCamp because the Elevation Profile in MapSource is throwing an error, otherwise MapSource simplicity would win me over.

The next blog post is about loading and using the OSM maps in the GPS on a microSD card.
If you don't have a micro SD card already you might want to order one - they are quite cheap on Amazon.